Data Preparation and Validation Techniques#
Machine Learning Methods#
Module 2: Data Preparation and Validation Techniques#
Instructor: Farhad Pourkamali#
Overview#
Data Loading, Understanding, and Filtering (https://youtu.be/FvlAINfSLyg)
Understanding data structure (input features, target variables, and types of data)
Descriptive statistics
Data visualization for understanding distributions and relationships (e.g., histograms, scatter plots, correlation matrices)
Feature Engineering (https://youtu.be/CFA877KhPl0)
Feature scaling (standardization, normalization)
Feature transformation (e.g., polynomial features)
Data Splitting and Cross-Validation (https://youtu.be/brqCqB3xfX8)
Train-Test Split
Validation Set (Role of a validation set in model tuning)
K-Fold Cross-Validation (Description and implementation)
Leave-One-Out Cross-Validation (LOOCV)
Pipelines for Automated Preprocessing (https://youtu.be/1sm0ZcVZK8c)
Integrating feature engineering and predictive modeling in
sklearnpipelines
1. Data Loading, Understanding, and Filtering#
pandas.read_csvis a function to load CSV (Comma Separated Values) files into a Pandas DataFrame for analysis and manipulation.Here’s the general syntax for the
pandas.read_csvfunction (https://pandas.pydata.org/docs/reference/api/pandas.read_csv.html):
pandas.read_csv(
    filepath_or_buffer,        # Filepath or URL to the CSV file
    sep=',',                   # Delimiter (default is ',')
    header='infer',            # Row number to use as header (default is the first row)
    index_col=None,            # Column(s) to use as the index
    usecols=None,              # Columns to read (list of column names or indices)
)
import numpy as np
import pandas as pd

df = pd.read_csv("https://raw.githubusercontent.com/farhad-pourkamali/MATH4388Online/refs/heads/main/data/Auto.csv")


df
The index rows of a DataFrame can be accessed using the
.indexattributeThe column names of a DataFrame can be accessed using the
.columnsattribute
# Check the index
print("Index Rows:")
print(df.index)
# Check column names
print("Column Names:")
print(df.columns)
Large datasets can have thousands of rows and columns.
Displaying the entire DataFrame (
df) floods the output, making it hard to read or find relevant information.df.head()returns only the first 5 rows by default.
df.head()
The
.info()method in Pandas is used to provide a concise summary of a DataFrame, giving key information about the structure and contents of the data. It is especially useful for getting an overview of large datasets.
df.info() # Do you see any problems?
df["horsepower"].iloc[0]
type(df["horsepower"].iloc[0])
# convert a column with str values to floats
# Convert non-numeric values (e.g., 'abc', '?', 'N/A') to NaN

df['horsepower'] = pd.to_numeric(df['horsepower'], errors='coerce')

df.head()
df.info()
# Count the number of NaN values

print(df['horsepower'].isnull().sum())
# Remove rows with at least one NaN

df_cleaned = df.dropna()
df_cleaned.info()
# Drop the column in-place
df_cleaned.drop(columns=["name"], inplace=True)

df_cleaned
The
.describe()method provides a statistical summary of numerical columns in a DataFrame.
df_cleaned.describe()
import matplotlib.pyplot as plt

# customization
plt.rc('font', size=14)
plt.rc('axes', labelsize=14, titlesize=14)
plt.rc('legend', fontsize=14)
plt.rc('xtick', labelsize=10)
plt.rc('ytick', labelsize=10)

# histogram
df_cleaned.hist(bins=10, figsize=(12, 8))

plt.tight_layout()
plt.show()
Seaborn (https://seaborn.pydata.org/index.html) is a Python library built on top of Matplotlib, designed to simplify the creation of complex and attractive statistical plots with minimal code.
Seaborn works seamlessly with Pandas DataFrames.
import seaborn as sns

sns.pairplot(df_cleaned, diag_kind='hist', corner=True)

plt.show()
For two vectors \(\mathbf{x}\) and \(\mathbf{y}\) (or columns of a DataFrame), the Pearson correlation coefficient \(\rho\) is given by
\(\rho=1\): Perfect positive linear relationship
\(\rho=-1\): Perfect negative linear relationship
\(\rho=0\): No linear relationship
# Compute the correlation matrix
correlation_matrix = df_cleaned.corr()

# Plot the heatmap
plt.figure(figsize=(8, 5))

sns.heatmap(correlation_matrix, annot=True, cmap="coolwarm", fmt=".2f", linewidths=0.5)

plt.title("Correlation Matrix")

plt.show()
# Use value_counts with normalize=True to calculate percentages
percentages = df_cleaned['origin'].value_counts(normalize=True) * 100

# Display the percentages
print("\nPercentages of each group:")
print(percentages)
# Use value_counts with normalize=True to calculate percentages
percentages = df_cleaned['cylinders'].value_counts(normalize=True) * 100

# Display the percentages
print("\nPercentages of each group:")
print(percentages)
Next, we write a function that keeps cars with 4, 6, and 8 cylinders, selects appropriate columns for input features and output labels, and returns them as DataFrames.
def filter_and_select_features(data):
    """
    Filters the dataset for cars with 4, 6, and 8 cylinders,
    selects input features and output labels, and returns them as DataFrames.

    Parameters:
        data (pd.DataFrame): The input DataFrame containing car data.

    Returns:
        X (pd.DataFrame): DataFrame containing input features.
        y (pd.DataFrame): DataFrame containing the output labels (mpg).
    """
    # Step 1: Filter rows for cars with 4, 6, and 8 cylinders
    filtered_data = data[data['cylinders'].isin([4, 6, 8])]

    # Step 2: Select columns for input features
    input_columns = ["horsepower", "weight"]
    X = filtered_data[input_columns]

    # Step 3: Select the "mpg" column as the output label
    y = filtered_data[["mpg"]]

    return X, y
X, y = filter_and_select_features(df_cleaned)

X.head()
y.head()
# 3D Plot
fig = plt.figure(figsize=(6, 6))
ax = fig.add_subplot(111, projection='3d')

# Extract data
x1 = X["horsepower"]
x2 = X["weight"]
x3 = y["mpg"]

# Create scatter plot
ax.scatter(x1, x2, x3, c='r', marker='o')

# Set labels
ax.set_xlabel("horsepower")
ax.set_ylabel("weight")
ax.set_zlabel("mpg")

ax.view_init(elev=20, azim=5)

plt.tight_layout()

plt.show()
Hence, the regression problem can be viewed as
Multicollinearity occurs when two or more predictor variables in a regression model are highly correlated
Makes it difficult to assess the individual effect of each predictor on the dependent variable
Reduces model interpretability and reliability
Here are several possible ways to address multicollinearity
Remove one or more of the highly correlated predictors
Combine correlated features into a single feature using aggregation or transformation
Apply penalties to large coefficients, reducing the impact of multicollinearity
Use models that handle multicollinearity well (e.g., Decision Trees)
2. Feature Engineering#
When features are in different ranges (e.g., weights and horsepowers), machine learning methods can behave poorly due to the dominance of larger-scaled features.
Techniques to address scale issues:
Standardization: Rescales features to have a mean of 0 and standard deviation of 1. Useful for algorithms assuming Gaussian-like distributions or when feature magnitudes vary greatly.
Normalization: Rescales features to be in the range \([0, 1]\). Useful for algorithms sensitive to magnitude but not distribution.
Equations (\(\mu\) represents the mean and \(\sigma\) is the standard deviation)
from sklearn.preprocessing import StandardScaler

# Standardization
scaler = StandardScaler()
standardized = scaler.fit_transform(X)

X = pd.DataFrame(standardized, columns=X.columns)

X
# Can we verify?

print("means:\n", X.sum(axis=0))

print("standard deviations:\n", X.std(axis=0))
Polynomial Transformation#
Polynomial transformation increases the dimensionality of your feature space by adding higher-degree combinations of features.
This can help capture complex, nonlinear relationships between the features and the target variable.
Given two features, \(x_1\) (horsepower) and \(x_2\) (weight), a polynomial transformation of degree \(d\) creates new features by including all combinations of \(x_1\) and \(x_2\) up to the given degree.
Degree 1: \(x_1\) and \(x_2\)
Degree 2: \(x_1\), \(x_2\), \(x_1^2\), \(x_2^2\), \(x_1x_2\)
Note that we can include “1”, which corresponds to the bias term (intercept)
from sklearn.preprocessing import PolynomialFeatures

# Polynomial transformation of degree 2
poly = PolynomialFeatures(degree=2, include_bias=False)
poly_features = poly.fit_transform(X)

# Create a DataFrame for better readability
feature_names = poly.get_feature_names_out(input_features=X.columns)

poly_X = pd.DataFrame(poly_features, columns=feature_names)

poly_X
Hence, the regression model works in the following form
3. Data Splitting and Cross-Validation#
Train-Test Split: This is a crucial step in machine learning where you divide your data set into two parts:
Training set: Used to train the machine learning model.
Testing set: Used to evaluate the trained model’s performance on unseen data.

Random Sampling:
Each data point has an equal chance of being assigned to either the training or testing set.
Simple and often sufficient for large, well-balanced data sets.
Using
train_test_split:You can easily split your data using the
train_test_splitmethod from thesklearn.model_selectionmodule.Specify the desired
test_size(e.g., 0.25 for a 25% test set) and set arandom_state(e.g., random_state=42) to ensure that you get the same split every time you run your code.Your model’s performance might vary significantly depending on the specific random split generated by the chosen
random_state.If you only evaluate with one split, you might get an overly optimistic or pessimistic estimate of how well your model generalizes.
X
y
from sklearn.model_selection import train_test_split

# Random Sampling
X_train, X_test, y_train, y_test = train_test_split(X, y,
                                                    test_size=0.25,
                                                    random_state=42)
X_train
y_train
X_test
y_test
Validation Set#
Machine learning models have hyperparameters that need to be adjusted for optimal performance. For example, consider the polynomial transformation of the input features (degree 1 vs. 2)
or
If you only have train and test sets, you might end up overfitting your model to the test set during hyperparameter tuning.
This happens because you are repeatedly evaluating on the test set and indirectly “learning” its characteristics.
A separate validation or development set prevents this.

# Assuming you already have this:
X_train, X_test, y_train, y_test = train_test_split(X, y, test_size=0.25, random_state=42)

# Now, split the training data again to create a validation set
X_train, X_val, y_train, y_val = train_test_split(
    X_train, y_train, test_size=0.3, random_state=42  # Use a different test_size here
)

# You now have:
# - X_train, y_train: Training set
# - X_val, y_val: Validation set
# - X_test, y_test: Test set
print(X_train.shape, X_val.shape, X_test.shape)
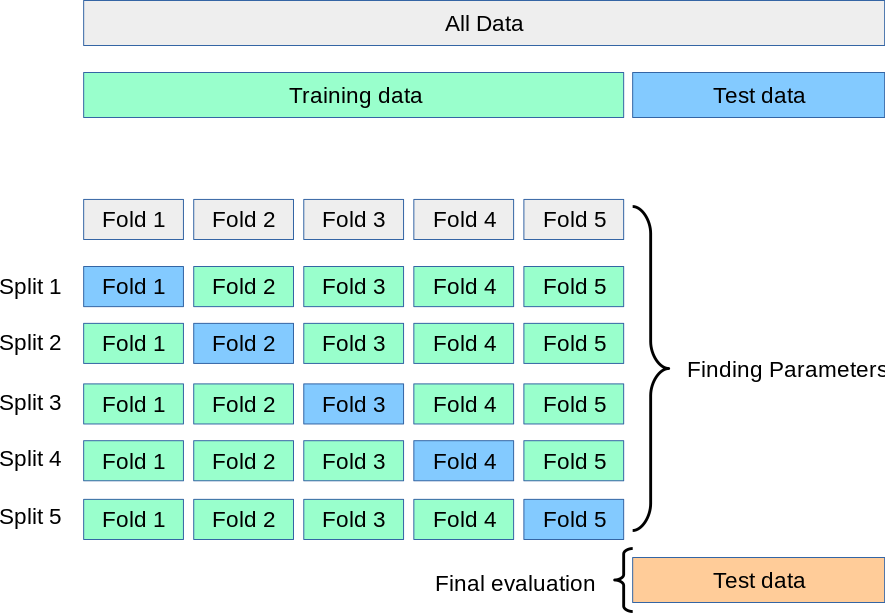
Cross-Validation#
Challenges of Train-Test Split
Limited Data: Splitting data into three sets (train, validation, test) can significantly reduce the amount of data available for training, especially with smaller data sets.
Split Dependency: Results can vary depending on the random split of training and validation data.
What is Cross-Validation (CV)?
No Separate Validation Set: CV eliminates the need for a dedicated validation set.
K-fold CV:
Divide the data into K equal-sized folds.
Train the model K times, each time using K-1 folds for training and the remaining fold for validation.
Average the performance across all K folds to get a more robust performance estimate.
A test set should still be held out for final evaluation, but the validation or development set is no longer needed when doing CV.
Benefits of CV:
More Effective Data Usage: Utilizes more data for training compared to having a separate validation set.
Reduced Split Dependency: Less sensitive to how the data is split, providing a more reliable performance estimate.
Leave-One-Out Cross-Validation (LOOCV) is a special case of K-fold cross-validation where K is equal to the number of data points in your data set.
Each fold consists of a single data point.
The
cross_val_scorefunction fromsklearn.model_selectionhelps you evaluate your model’s performance using K-fold cross-validation.Syntax:
cross_val_score(estimator, X, y=None, scoring=None, cv=None)
Parameters:
estimator: The model or object to use to fit the data. (e.g.,
LinearRegression())X: The data to fit. Can be, for example, a list, or an array.
y: The target variable to try to predict. (Optional for unsupervised learning)
scoring: A string or a callable to evaluate the predictions on the test set. (e.g., ‘accuracy’, ‘f1’, ‘roc_auc’)
cv: Determines the cross-validation splitting strategy (e.g., an integer for the number of folds)
# Split the data into training and testing sets

X_train, X_test, y_train, y_test = train_test_split(
    X, y, test_size=0.2, random_state=20)
from sklearn.linear_model import LinearRegression
from sklearn.model_selection import cross_val_score

# Create a linear regression model
model = LinearRegression()

# Perform 5-fold cross-validation on the training data
scores = cross_val_score(model, X_train, y_train, scoring='r2', cv=5)

# Print the scores for each fold
print("Cross-validation scores:", scores)

# Calculate and print the average score
print("Average cross-validation score:", scores.mean())
# Fit on full training data
model = LinearRegression()
model.fit(X_train, y_train)

# Evaluate using the test data
y_pred = model.predict(X_test)

from sklearn.metrics import r2_score

print("final score:", r2_score(y_test, y_pred))
import matplotlib.pyplot as plt
import numpy as np

plt.figure(figsize=(5, 4))
plt.scatter(y_test, y_pred, alpha=0.5)

# Add the 45-degree line
min_value = min(min(y_test.to_numpy()), min(y_pred))
max_value = max(max(y_test.to_numpy()), max(y_pred))
plt.plot([min_value, max_value], [min_value, max_value], 'k--', lw=2)  # Dashed line

plt.xlabel("Actual Values")
plt.ylabel("Predicted Values")
plt.grid(True)
plt.show()
In the following, we will use
cross_val_scoreto find the optimal degree of the polynomial transformation.
# Find the optimal degree using cross-validation
best_degree = 1  # Start with degree 1
best_cv_score = -np.inf

for degree in range(1, 11):  # Check degrees from 1 to 10

    # Create polynomial features for the current degree
    poly = PolynomialFeatures(degree=degree)
    X_train_poly = poly.fit_transform(X_train)

    model = LinearRegression()

    # Perform 5-fold cross-validation
    cv_scores = cross_val_score(model, X_train_poly, y_train, scoring='r2', cv=5)

    # Calculate the average
    mean_cv_score = np.mean(cv_scores)

    if mean_cv_score > best_cv_score:
        best_cv_score = mean_cv_score
        best_degree = degree

print(f"Best degree: {best_degree}")
best_cv_score
# Fit on full training data
poly = PolynomialFeatures(degree=best_degree)
X_train_poly = poly.fit_transform(X_train)
model = LinearRegression()
model.fit(X_train_poly, y_train)

# Evaluate using the test data
y_pred = model.predict(poly.transform(X_test))

from sklearn.metrics import r2_score

print("final score:", r2_score(y_test, y_pred))
In sklearn,
cross_validateis more versatile thancross_val_score, allowing evaluation of multiple metrics, access to training scores, and collection of additional information (e.g., fit time and score time).
from sklearn.model_selection import cross_validate

# Create polynomial features for the current degree
poly = PolynomialFeatures(degree=2)
X_train_poly = poly.fit_transform(X_train)

model = LinearRegression()

# Perform 5-fold cross-validation
results = cross_validate(model, X_train_poly, y_train, scoring='r2', cv=5)

print(results)
Choose
cross_val_scorefor simplicity andcross_validatefor flexibility and more detailed insights.
4. Pipelines for Automated Preprocessing#
A pipeline is a way to chain together multiple data transformations and a final estimator (i.e., a machine learning model) into a single, cohesive object.

It simplifies your code and ensures that the same steps are applied consistently during both training and prediction.
Syntax
Pipeline(steps)
Parameters:
steps: List of
(name, transform)tuples (implementing fit/transform) that are chained, in the order in which they are chained, with the last object an estimator.
from sklearn.pipeline import Pipeline

df = pd.read_csv("https://raw.githubusercontent.com/farhad-pourkamali/MATH4388Online/refs/heads/main/data/Auto.csv")

df['horsepower'] = pd.to_numeric(df['horsepower'], errors='coerce')

df_cleaned = df.dropna()

# Select input features and outputs
X, y = filter_and_select_features(df_cleaned)

X
# Create the pipeline
pipeline = Pipeline([
    ('scaler', StandardScaler()),           # Feature scaling
    ('poly', PolynomialFeatures(degree=2)), # Polynomial features
    ('model', LinearRegression())           # Linear regression model
])

# Split data
X_train, X_test, y_train, y_test = train_test_split(X, y,
                                                    test_size=0.2,
                                                    random_state=20)

# Fit the pipeline (all steps together)
pipeline.fit(X_train, y_train)

# Make predictions
y_pred = pipeline.predict(X_test)

print("final score:", r2_score(y_test, y_pred))
Recommended Reading#
Chapter 2 of Hands-on Machine Learning with Scikit-Learn, Keras and TensorFlow: ageron/handson-ml3